Configuration

Our current Chat service is a singleton and has hard coded service properties. This is not so nice. It would be better if we could set the user.name through configuration. To add configuration data to a component, we must make an annotation interface with the data that we need. In our case we want to set the user.name service property. For example:
package osgi.enroute.examples.chat.provider;

import org.osgi.service.metatype.annotations.ObjectClassDefinition;

@ObjectClassDefinition
@interface Configuration {
  String user_name() default "osgi";
}
Editor
So the next question is, how to set this configuration? It would nice if there was an editor for it.
Well, this can be arranged. We can link the Configuration interface to a component. This is sufficient to let the Apache Felix Webconsole create a simple form for us to set the configuration. For this we need to use the @Designate annotation on the same type as the component.
In this case we want to keep our Chat service a singleton to keep it simple. We’re also ok to have a default user name of osgi. This means that the @Designate annotation should have factory=false. If we don’t do anything special then the component will use the specified service property for user.name as the default.
This turns our implementation class into:
package com.mycompany.chat.provider;

import org.osgi.service.component.annotations.Component;
import org.osgi.service.metatype.annotations.Designate;

import com.mycompany.chat.api.Chat;
import com.mycompany.chat.api.Message;

@Designate(ocd=Configuration.class)

@Component(
	name = "osgi.enroute.examples.chat.provider", // CHANGE
	property = "user.name=osgi")
public class ChatImpl implements Chat {

	@Override
	public boolean send(Message message) throws Exception {
	System.out.printf("%s: %s%n", message.from, message.text);
	return true;
	}
}
Make sure to change the name of the component to your namespace.
Debugging
The current bndrun has no web console in there. We can easily fix this. Double click on the bnd.bnd file and select the Run tab. In the list of bundles, find XRay and drag it to the list of initial requirements. Resolve and save the bnd.bnd file. This will add a web server, web console, and some helper bundles.
You can now go to http://localhost:8080/system/console/xray to see XRay.
You might be asked to specify credentials, the defaults are:
User Id:		admin
Password:		admin
Web Console
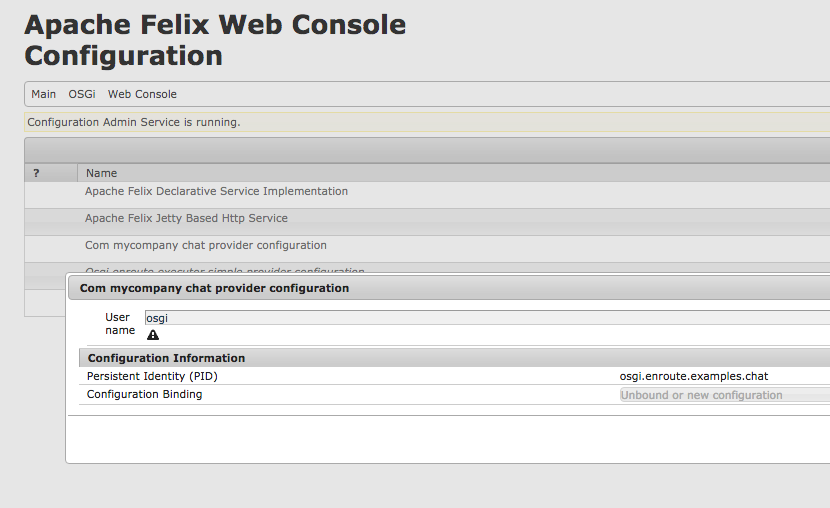
On a browser, you can now go to http://localhost:8080/system/console/configMgr to edit the configuration.
In the list of configurations you should see the entry:
Osgi enroute examples chat provider chat impl configuration

From the osgi.enroute.examples.chat.provider bundle. If you click on this entry then you get a small form that contains the entry for the User name. In there you can now file in your name. After you saved the configuration, the ChatImpl component will be restarted but now with a new value for the service property. We can now list the local members to see if this worked:
	g! members
	pkriens
Cleaning Up
We can now stop the framework for the osgi.enroute.examples.chat.provider project. In the next sections we will first start a Zookeeper server in preparation for an application that creates a distributed OSGi environment.
So stop your running framework. You can do this by going to the Debug perspective and terminating any running processes.
Prev Next