Bndtools Tutorial
Introduction
In this tutorial we will build a sample application composed of two components and an API. The following diagram shows the bundle architecture (simplified):
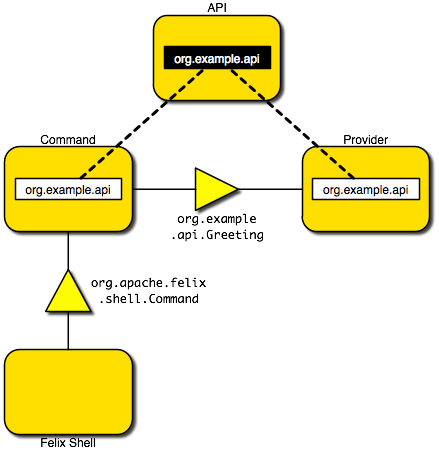
In the tutorial we create the top three bundles (rectangles):
- The API bundle exports a service interface,
Greeting. - The Provider bundle imports the interface and publishes an instance of the service.
- The Command bundle imports the interface and binds to the service instance, and also publishes a
Commandservice that is used by the Felix Shell bundle.
Note: This tutorial has been updated for Bndtools 7.2.1+ and reflects changes in recent versions. Some screenshots may show older versions of the UI. Key differences from older versions include:
- Updated cnf directory structure with
cache/andext/folders - Use of standard OSGi annotations (
org.osgi.service.component.annotations) instead of legacy aQute annotations - Changes in default bundle behavior and template availability
- Different default file associations for
bnd.bndfiles
Installing Bndtools
Please refer to the Installation Instructions.
Create a Bndtools Workspace
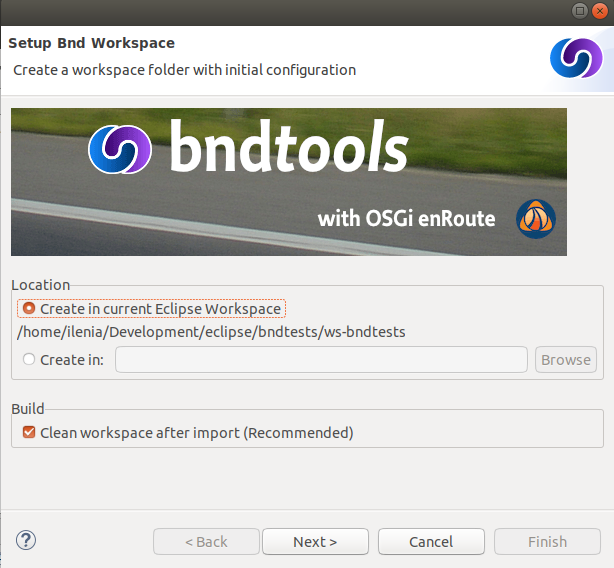
If your current workspace is not configured as a Bnd Workspace yet, before creating a project, we need to set up the Bnd OSGi Workspace.
-
Switch to the Bndtools view
-
From the File menu, select New -> Bnd OSGi Workspace
-
A wizard will open and it should look like the one in the figure
-
Select the location in your file system to be linked to the workspace (the default one is your current Eclipse workspace location) and then press Next
-
In the next page of the wizard select from the templates bndtools/workspace and press Next
-
The next page is simply an overview of the files that will be automatically included. Just press Finish
-
You should end up with a new cnf folder in your workspace. If you expand it, you should see something similar to this figure.
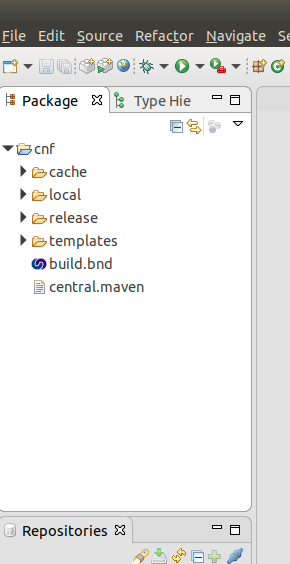
Note: In Bndtools 7.2.1+, the cnf directory structure has been updated and now typically includes:
- cache/ - for caching downloaded artifacts
- ext/ - for workspace extension configuration files (like
build.mvn,central.mvn, etc.) - build.bnd - the main workspace configuration file
This is slightly different from older versions but provides better organization for workspace settings.
If this is the case, you are now ready to create your first Bnd OSGi project!
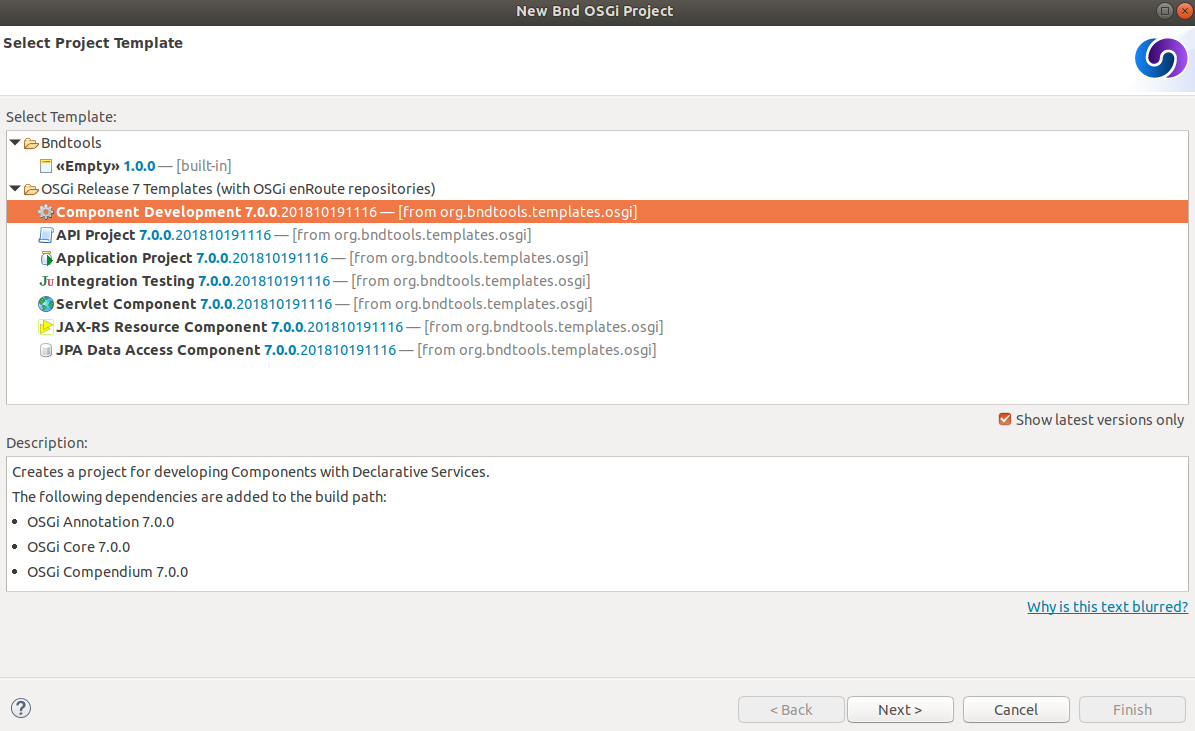
Create an API Project
First we need to create a Bnd OSGi Project. This is just a standard Eclipse Java Project, with an additional builder for constructing OSGi bundles.
-
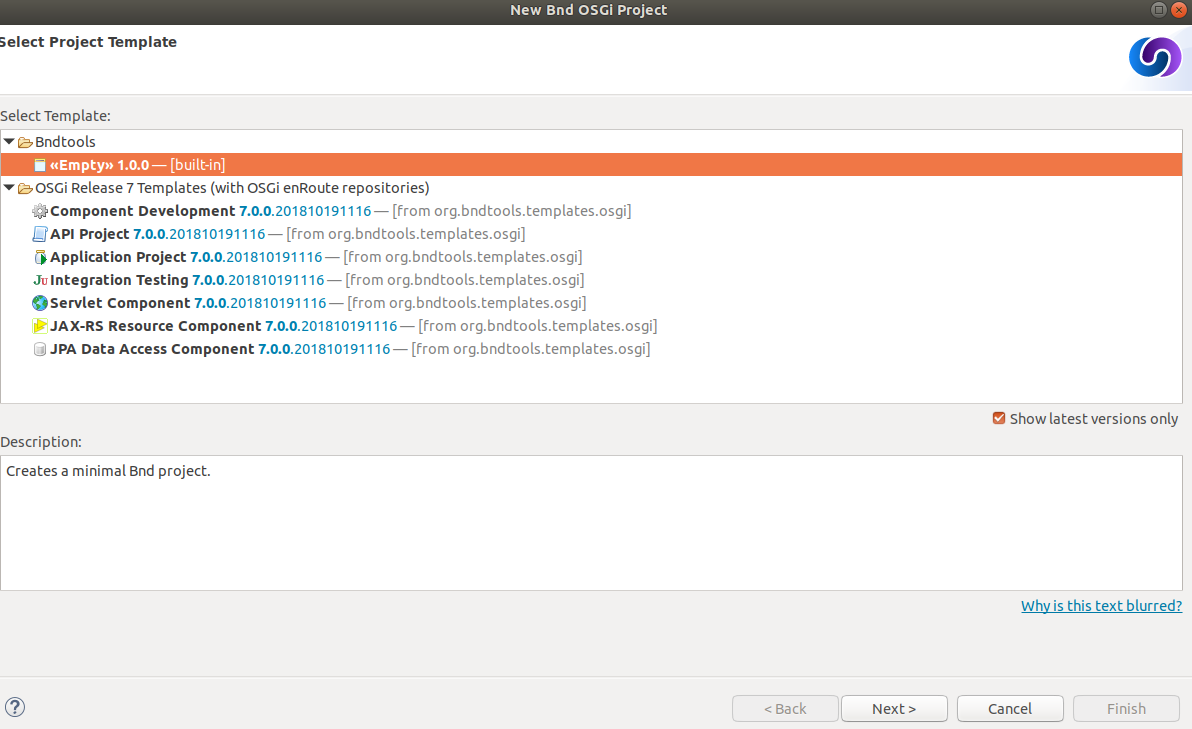
From the File menu, select New -> Bnd OSGi Project.
-
A wizard should open and you should see something which looks like this:
-
As you see, you have the possibility to choose among a series of templates or to create a new project from scratch. For this first tutorial we will start with an empty project, thus, select the «Empty» option (shown as «Empty» 1.0.0 — [built-in]) and press Next
Note: The available templates may vary depending on your Bndtools version and installed template bundles. In version 7.2.1+, you may see fewer templates initially compared to older versions
-
On the next page, you will be asked to enter the name of the project. Please, enter
org.example.apiin this case. Select then the JRE execution environment (at least J2SE-1.5) and press Next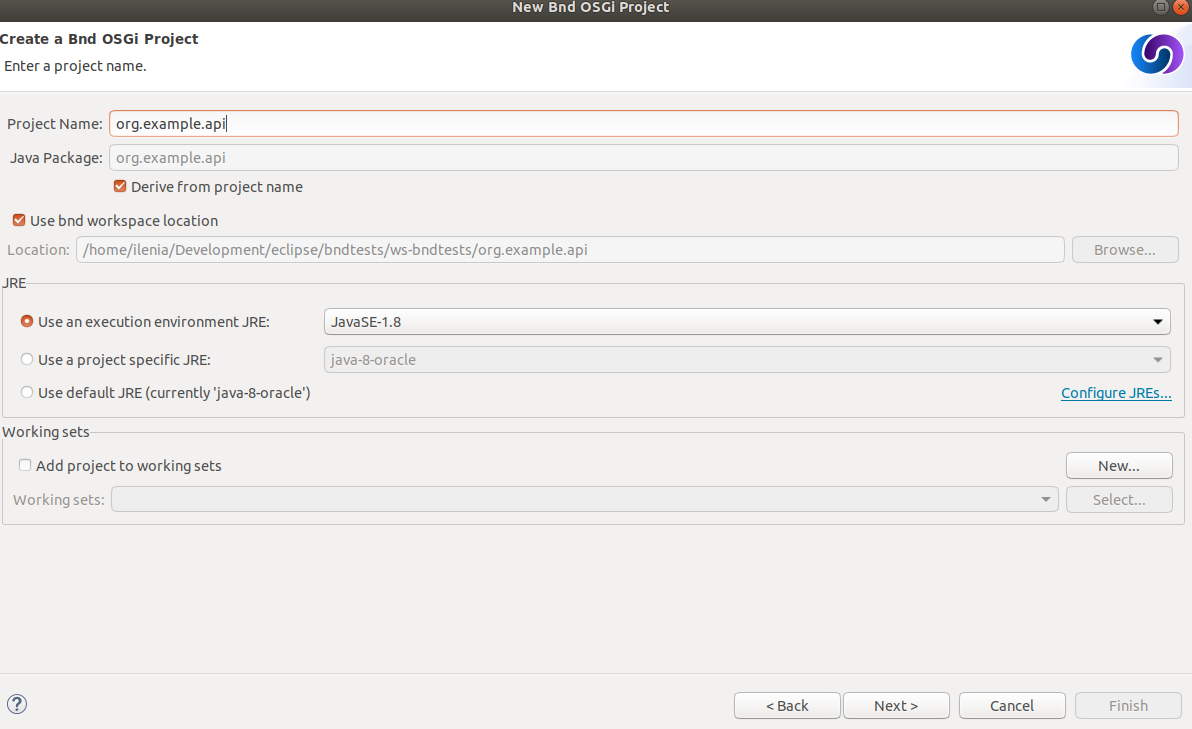
-
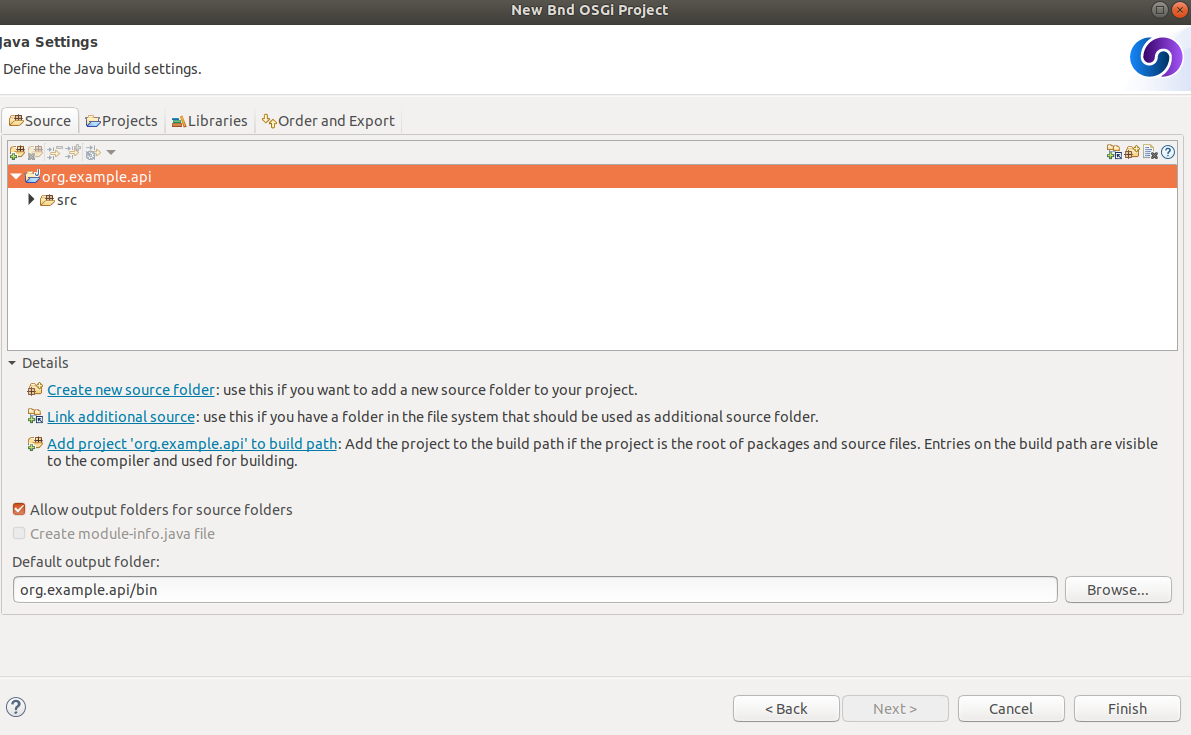
In the following page you will see an overview of the folders that will be created for this new project.
-
You can now press Finish and your new project will be created.
Important Points:
- Bndtools projects are based on standard Eclipse Java (JDT) projects.
- Bndtools uses a
cnfproject containing workspace-wide configuration that is normally shared between developers. It may also contain a repository of bundles. - A file named
bnd.bndis created at the top of each Bndtools project, which controls the settings for the project. The same settings are used by bnd when it is invoked from an offline ANT build.
Write and Export the API
OSGi offers strong decoupling of producers and consumers of functionality. This is done by encouraging an API-based (or in Java terms, interface-based) programming model, where producers of functionality implement APIs and the consumers of functionality bind only to APIs, not any particular implementation. For our example we will use a fairly trivial API.
In the src directory of the new project, create a package named org.example.api. In the new package create a Java interface named Greeting, as follows:
package org.example.api;

public interface Greeting {
    String sayHello(String name);
}
Define the Bundle
The project we have created defines a single bundle with a Bundle Symbolic Name (BSN) of org.example.api (i.e., the same as the project name). As soon as we created the project, a bundle file named org.example.api.jar was created in the generated directory, and it will be rebuilt every time we change the bundle definition or its source code.
Note: In recent versions of Bndtools (7.0+), the bundle behavior has changed. Even with an empty bnd.bnd file, the bundle may include compiled classes from your source packages. The bundle is no longer completely empty by default. However, to make packages available to other bundles, you still need to explicitly export them via the Export Packages panel. Without explicit exports, the packages remain private to your bundle.
We want to add the package org.example.api to the exported packages of the bundle. So open the bnd.bnd file at the top of the project.
Note: In recent Eclipse/Bndtools versions, double-clicking bnd.bnd may open the source editor directly instead of the Bundle Editor UI. If this happens, right-click on bnd.bnd and select Open With > Bnd Bundle Editor to access the graphical editor.
Once the editor is open, select the Contents tab. Now the package can be added in one of two ways:
- Click the “+” icon in the header of the Export Packages section, then select
org.example.apifrom the dialog and click OK… or - Drag-and-drop the package
org.example.apifrom Eclipse’s Package Explorer view into the Export Packages list.
(TIP: Advanced users may prefer to enter Export-Package: org.example.api manually in the Source tab).
As soon as this is done, a popup dialog appears titled “Missing Package Info”. This dialog is related to package versioning: it is asking us to declare the version of this exported package. Click OK.
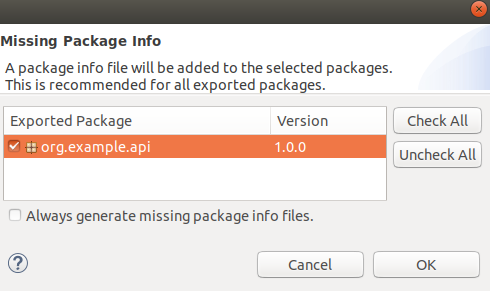
Note on Package Versioning: When you click OK, Bndtools will create a package-info.java file (for Java 9+) or packageinfo file (for older Java versions) in your package. The package-info.java file will contain OSGi package versioning annotations. If you see compilation errors in this file (such as missing org.osgi.annotation.bundle or org.osgi.annotation.versioning packages), you may need to add the OSGi annotation bundle to your build path. This can be resolved by adding the appropriate OSGi compendium dependency to your bnd.bnd file’s build path, or the errors may be cosmetic and not affect the actual build.
The Contents tab should now appear as in the following screenshot:
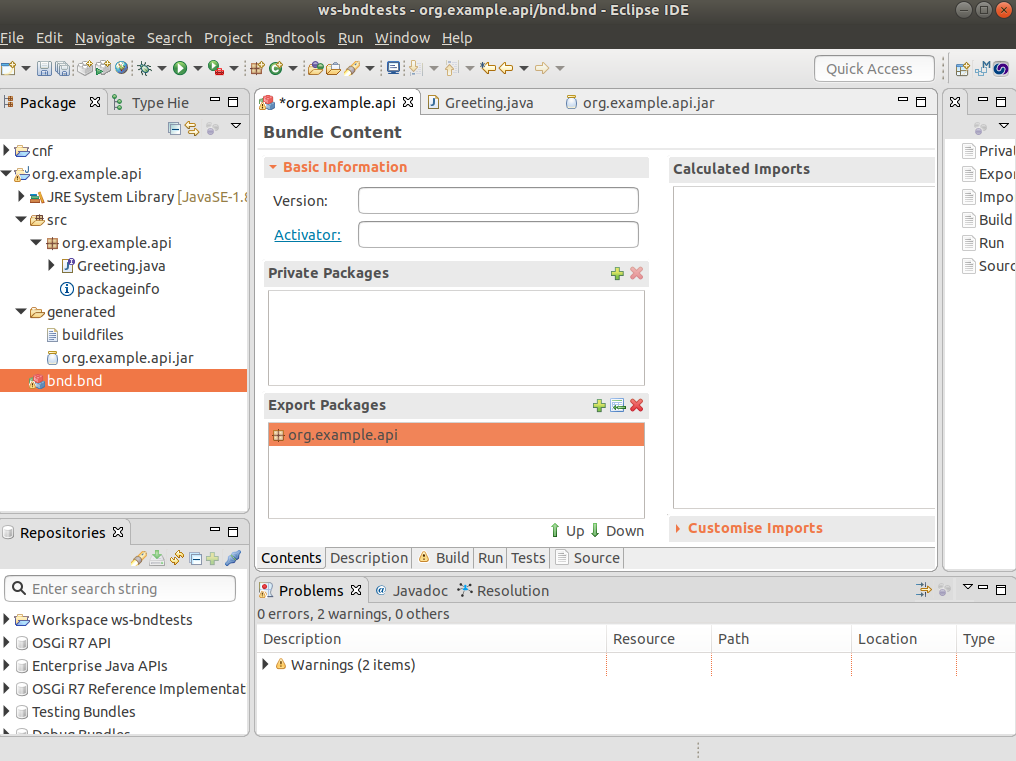
Save the file, and the bundle will be rebuilt to include the selected export.
Important Points:
- The project configuration and the bundle contents are defined by
bnd.bnd. - The identity of a bundle – its “Bundle Symbolic Name” or BSN – is controlled by the project name. In this case, the bundle’s BSN is equal to the project name.
- Bundles are always empty until we explicitly add contents to them. Adding a package to the Export Packages panel included that package in the bundle, and also declared it as an export in the
META-INF/MANIFEST.MF. - Normally bundles contain more than just a single interface. This example is intentionally simplistic.
Create an Implementation Project
We will now create another project that defines two bundles: a provider and a client of the Greeting API.
Create the Project
Create another Bnd OSGi project, named org.example.impl. At the Project Templates step:
- If available, select Component Development template from the OSGi Standard Templates category
- If the Component Development template is not visible, you can:
- Select the «Empty» template and manually create the necessary files, or
- Use the API Project template as an alternative starting point
Then proceed as for the previous project.
Note: In some Bndtools installations (particularly version 7.2.1+), the Component Development template may not appear in the template list. This can happen if template bundles are not fully loaded. If you don’t see this template, you can use the Empty template and create the component structure manually as shown in this tutorial.
Add the API as a Build Dependency
We need to add the API project as a build-time dependency of this new project.
The bnd.bnd file of the newly created project will have opened automatically. Click the Build tab and add org.example.api in either of the following ways:
-
Click the “+” icon in the toolbar of the Build Path panel. Double-click
org.example.apiunder “Workspace” in the resulting dialog; it will move over to the right-hand side. Click Finish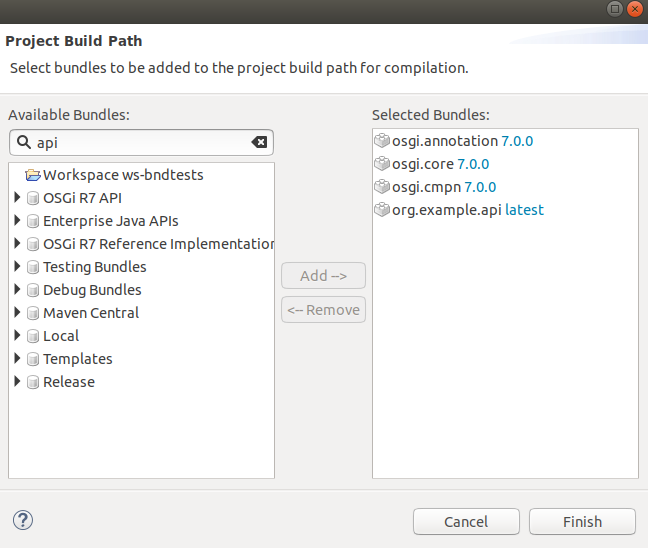
-
OR drag-and-drop
org.example.apifrom the Repositories view into the Build Path panel.
In either case, the org.example.api bundle will appear in the Build Path panel with the version annotation “latest”:
- Save the file.
Important Points:
- Build-time dependencies of the project can be added in the Build Path panel of the
bnd.bndeditor. - Adding dependencies in this way (i.e. rather than via Eclipse’s existing “Add to Build Path” menu) ensures that exactly the same dependencies are used when building off-line with ANT.
Write an Implementation
We will write a class that implements the Greeting interface.
If you used the Component Development template: A Java source file for a class named org.example.impl.Example should have been generated. Open this source file now and make it implement Greeting.
If you used the Empty template: Create a new package org.example.impl in the src folder, then create a new Java class named Example in that package. Then make it implement Greeting as shown below:
package org.example.impl;

import org.example.api.Greeting;

import org.osgi.service.component.annotations.Component;

@Component
public class Example implements Greeting {
    public String sayHello(String name) {
        return "Hello " + name;
    }
}
Note the use of the @Component annotation from org.osgi.service.component.annotations. This enables our bundle to use OSGi Declarative Services to declare the API implementation class. This means that instances of the class will be automatically created and registered with the OSGi service registry. The annotation is build-time only, and does not pollute our class with runtime dependencies – in other words, this is a “Plain Old Java Object” or POJO.
Note: Modern Bndtools versions use the standard OSGi annotations from org.osgi.service.component.annotations package instead of the legacy aQute.bnd.annotation.component annotations. Make sure to use the correct import as shown above.
Test the Implementation
We should write a test case to ensure the implementation class works as expected.
If you used the Component Development template: In the test folder, a test case class should already exist named org.example.impl.ExampleTest.
If you used the Empty template: Create a new package org.example.impl in the test folder, then create a new JUnit test class named ExampleTest in that package.
The test class structure should look like this:
package org.example.impl;

import static org.junit.Assert.*;

import org.junit.Test;

public class ExampleTest {

    @Test
    public void test() {
        fail("Not yet implemented");
    }
}
Use the already provided test method and substitute its implementation with the following:
package org.example.impl;

import static org.junit.Assert.*;

import org.junit.Test;

public class ExampleTest {

    @Test
    public void test() throws Exception {
        String result = new Example().sayHello("Bob");
        assertEquals("Hello Bob", result);
    }
}
Now right-click on the file and select Run As > JUnit Test.
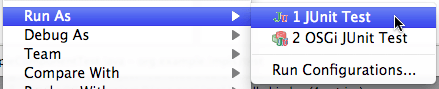
Verify that the JUnit view shows a green bar. If not, go back and fix the code!
Note that, since this is a unit test rather than an integration test, we did not need to run an OSGi Framework; the standard JUnit launcher is used. Again, this is possible because the component under test is a POJO.
To learn more about Testing see this section of the manual as well as the section about Testing with Launchpad.
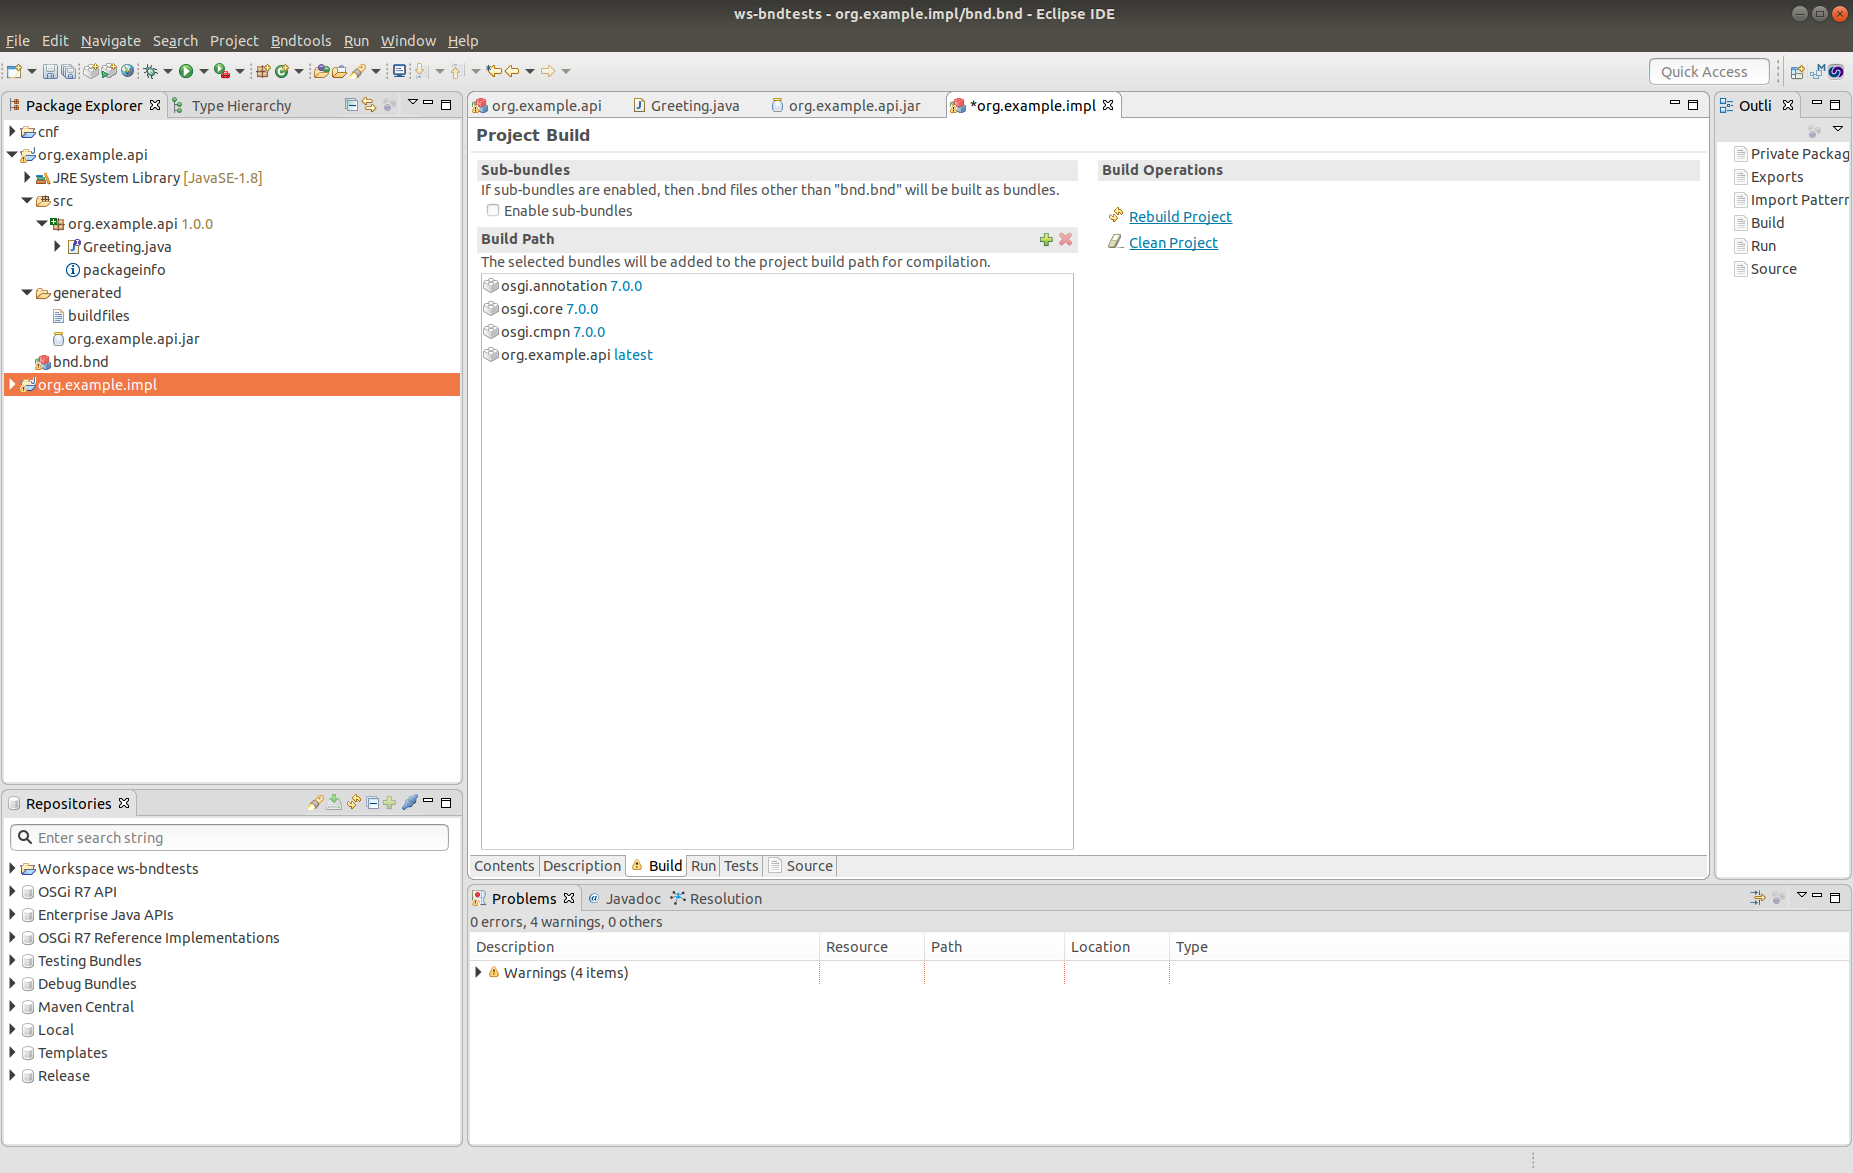
Build the Implementation Bundle
As in the previous project, a bundle is automatically built based on the content of bnd.bnd. In the current project however, we want to build two separate bundles. To achieve this we need to enable a feature called “sub-bundles”.
Right-click on the project org.example.impl and select New > Bundle Descriptor File (.bnd). In the resulting dialog, type the name provider for the Bnd File name and click Finish.
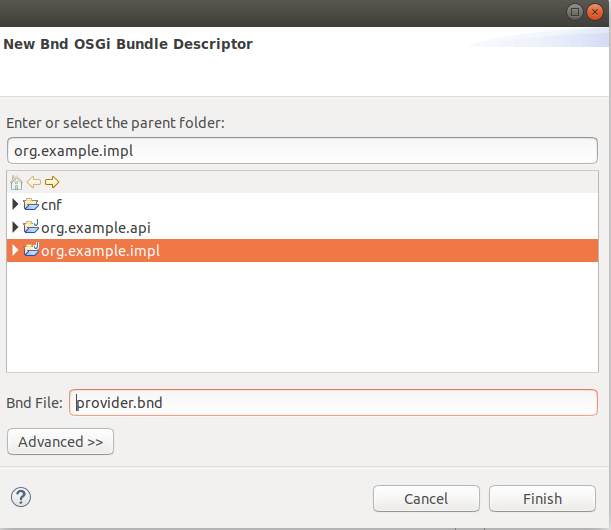
A popup dialog will ask whether to enable sub-bundles. Click OK.
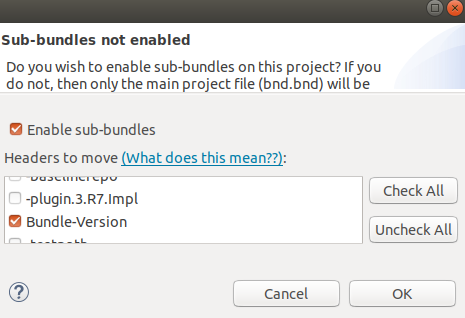
Some settings will be moved from bnd.bnd into the new provider.bnd file. Add the package org.example.impl to the Private Package of this newly created file. You should now find a bundle in generated named org.example.impl.provider.jar which contains the org.example package and a Declarative Services component declaration in OSGI-INF/org.example.impl.Example.xml.
Important Points:
- Bndtools project can output either a single bundle or multiple bundles.
- In the case of single-bundle projects, the contents of that bundle are defined in
bnd.bnd. - In the case of multi-bundle projects, the contents of each bundle is defined in a separate
.bndfile. Thebnd.bndfile is still used to define project-wide settings, such as build dependencies.
Run an OSGi Framework
We’d now like to run OSGi. To achieve this we need a “Run Descriptor” that defines the collection of bundles to run, along with some other run-time settings. This file is automatically created with the Component Development project template that we have used, and it is named launch.bndrun.
For creating a new “Run Descriptor”, in case you would need more than one, right-click on the project org.example.impls and select New > Run Descriptor File (.bndrun) . In the resulting dialog you will be asked to select a “Run Descriptor” from a template. Choose the Felix 4+ option and click Next.
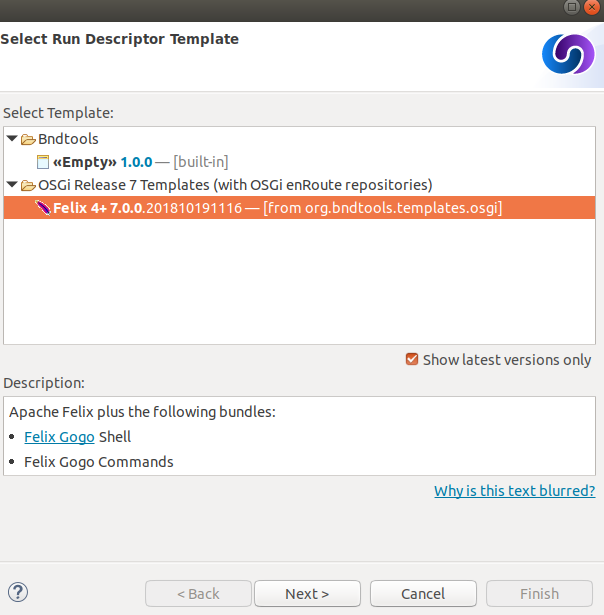
In the next page enter the name of the file and click Finish.
In the editor for your launch.bndrun file, click on Run OSGi near the top-right corner. Shortly, the Felix Shell prompt “g!” will appear in the Console view. Type the lb command to view the list of bundles:
Welcome to Apache Felix Gogo

g! lb
START LEVEL 1
   ID|State      |Level|Name
    0|Active     |    0|OSGi System Bundle (3.13.100.v20180827-1536)|3.13.100.v20180827-1536
    1|Active     |    1|Apache Felix Gogo Runtime (1.0.10)|1.0.10
    2|Active     |    1|Apache Felix Gogo Shell (1.0.0)|1.0.0
    3|Active     |    1|Apache Felix Gogo Command (1.0.2)|1.0.2
g!
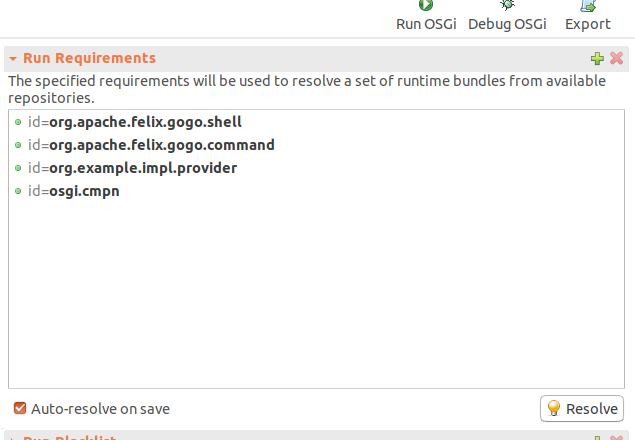
Next we want to include the org.example.impls.provider and osgi.cmpn bundles. This can be done as follows:
- Click the “+” icon in the toolbar of the Run Requirements panel to open the ‘Add Bundle Requirement’ dialog.
- Under “Workspace”, double-click
org.example.impls.provider. - Under “OSGi R7 API”, double-click
osgi.cmpn. - Click Finish.
The Run Requirements panel should now look like this:
If is not already selected, please, select the Execution Environment in the Core Runtime session of the file.

Note on OSGi Framework Selection: By default, you may only see the Felix framework in the OSGi Framework dropdown. If you want to use Equinox instead:
- Add the Equinox OSGi framework to one of your repositories (e.g., in
cnf/ext/central.mvn):org.eclipse.platform:org.eclipse.osgi:3.23.200(You can find the latest version on Maven Central)
- After adding it to your repository configuration, Equinox should appear as an option in the OSGi Framework dropdown in your run configuration.
Check Auto-resolve on save and then save the file. Returning to the Console view, type lb again:
g! lb
START LEVEL 1
   ID|State      |Level|Name
    0|Active     |    0|OSGi System Bundle (3.13.100.v20180827-1536)|3.13.100.v20180827-1536
    1|Active     |    1|Apache Felix Gogo Runtime (1.0.10)|1.0.10
    2|Active     |    1|Apache Felix Gogo Shell (1.0.0)|1.0.0
    3|Active     |    1|Apache Felix Gogo Command (1.0.2)|1.0.2
    4|Active     |    1|Apache Felix Declarative Services (2.1.10)|2.1.10
    5|Active     |    1|org.example.api (0.0.0)|0.0.0
    6|Active     |    1|org.example.impl.provider (0.0.0.201910251118)|0.0.0.201910251118
    7|Active     |    1|osgi.cmpn (4.3.1.201210102024)|4.3.1.201210102024
g!
The provider bundle has been added to the runtime dynamically. Note that the API bundle and Apache Felix Declarative Services are also added because they resolved as dependencies of the provider.
We can now look at the services published by our provider bundle using the command inspect capability service 6:
g! inspect capability service 6
org.example.impl.provider_0.0.0.201910251121 [6] provides:
----------------------------------------------------------
service; org.example.api.Greeting with properties:
   service.id = 45
   service.bundleid = 6
   service.scope = bundle
   component.name = org.example.impl.Example
   component.id = 1
g!
Our bundle now publishes a service under the Greeting interface.
Important Points:
- Run-time configurations can be defined in a
.bndrunfile. Multiple different run configurations can be used, resulting in different sets of bundles, different OSGi Framework implementations etc. - The set of bundles to include is derived from the Run Requirements list. Bndtools uses OBR resolution to resolve a list of bundles including their static dependencies.
- If the OSGi Framework is still running, then saving the
bndrunfile will cause the list of bundles to be dynamically updated. So we can add and remove bundles without restarting. - Editing an existing bundle – including editing the Java code that comprises it – will also result in the bundle being dynamically updated in the runtime.
Write a Command Component
Finally we will write a component that consumes the Greeting service and publishes a shell command that can be invoked from the Felix shell.
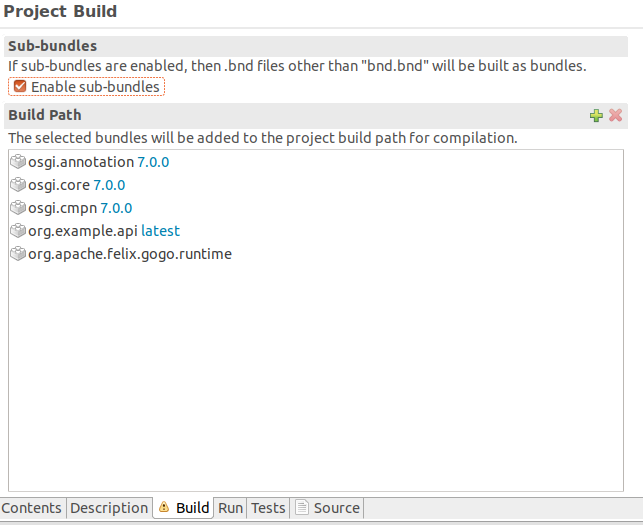
First we need to make the Felix shell API available to compile against. Open bnd.bnd and change to the Build tab. Add org.apache.felix.gogo.runtime to the list of build dependencies, and save the file:
Now create a new Java package under the src folder named org.example.command. In this package create a class GreetingCommand as follows:
package org.example.command;

import org.apache.felix.service.command.CommandProcessor;
import org.example.api.Greeting;
import org.osgi.service.component.annotations.Component;
import org.osgi.service.component.annotations.Reference;

@Component(property = {
        CommandProcessor.COMMAND_SCOPE + "=example",
        CommandProcessor.COMMAND_FUNCTION + "=greet"
    },
    service=GreetingCommand.class
)
public class GreetingCommand {
    private Greeting greetingSvc;

    @Reference
    public void setGreeting(Greeting greetingSvc) {
        this.greetingSvc = greetingSvc;
    }

    public void greet(String name) {
        System.out.println(greetingSvc.sayHello(name));
    }
}
Create a Bundle for the Command Component
The command component is not part of the provider bundle, because it lives in a package that was not included. We could add it to the provider bundle, but it would make more sense to create a separate bundle for it.
Right-click again on the org.example.impls project and select New > Bundle Descriptor File (.bnd) again. Enter the name as command and click Finish.
Add the package org.example.command to the Private Packages panel of the newly created file. As before, this can be done using the “+” button in the toolbar or by drag-and-drop.
Then save the file.
Add the Command Bundle to the Runtime
Switch back to the editor for launch.bndrun. In the Run Requirements tab, add the org.example.impls.command bundle, and save the file.
The command bundle will now appear in the list of bundles when typing lb:
g! lb
START LEVEL 1
   ID|State      |Level|Name
    0|Active     |    0|OSGi System Bundle (3.13.100.v20180827-1536)|3.13.100.v20180827-1536
    1|Active     |    1|Apache Felix Gogo Command (1.0.2)|1.0.2
    2|Active     |    1|Apache Felix Gogo Runtime (1.0.10)|1.0.10
    3|Active     |    1|Apache Felix Gogo Shell (1.0.0)|1.0.0
    4|Active     |    1|Apache Felix Declarative Services (2.1.10)|2.1.10
    5|Active     |    1|org.example.api (0.0.0)|0.0.0
    6|Active     |    1|org.example.impl.provider (0.0.0.201910250834)|0.0.0.201910250834
    7|Active     |    1|osgi.cmpn (4.3.1.201210102024)|4.3.1.201210102024
    8|Active     |    1|org.example.impl.command (0.0.0)|0.0.0
g!
Finally, the greet command will now be available from the Gogo shell:
g! greet BndTools
Hello BndTools
g!
More tutorials
For more tutorials and examples, have a look at the enroute Classic section.
