osgi.enroute.iot.circuit
When to Use?
The purpose of the osgi.enroute.iot.circuit service is to allow hardware to be shared between different bundles. Hardware resources are singletons and are not addressable in a uniform way. For example, on a Raspberry Pi, a General Purpose Input/Output (GPIO) pin can have different connectors or reside on a different pin on a similar or completely different looking connector.
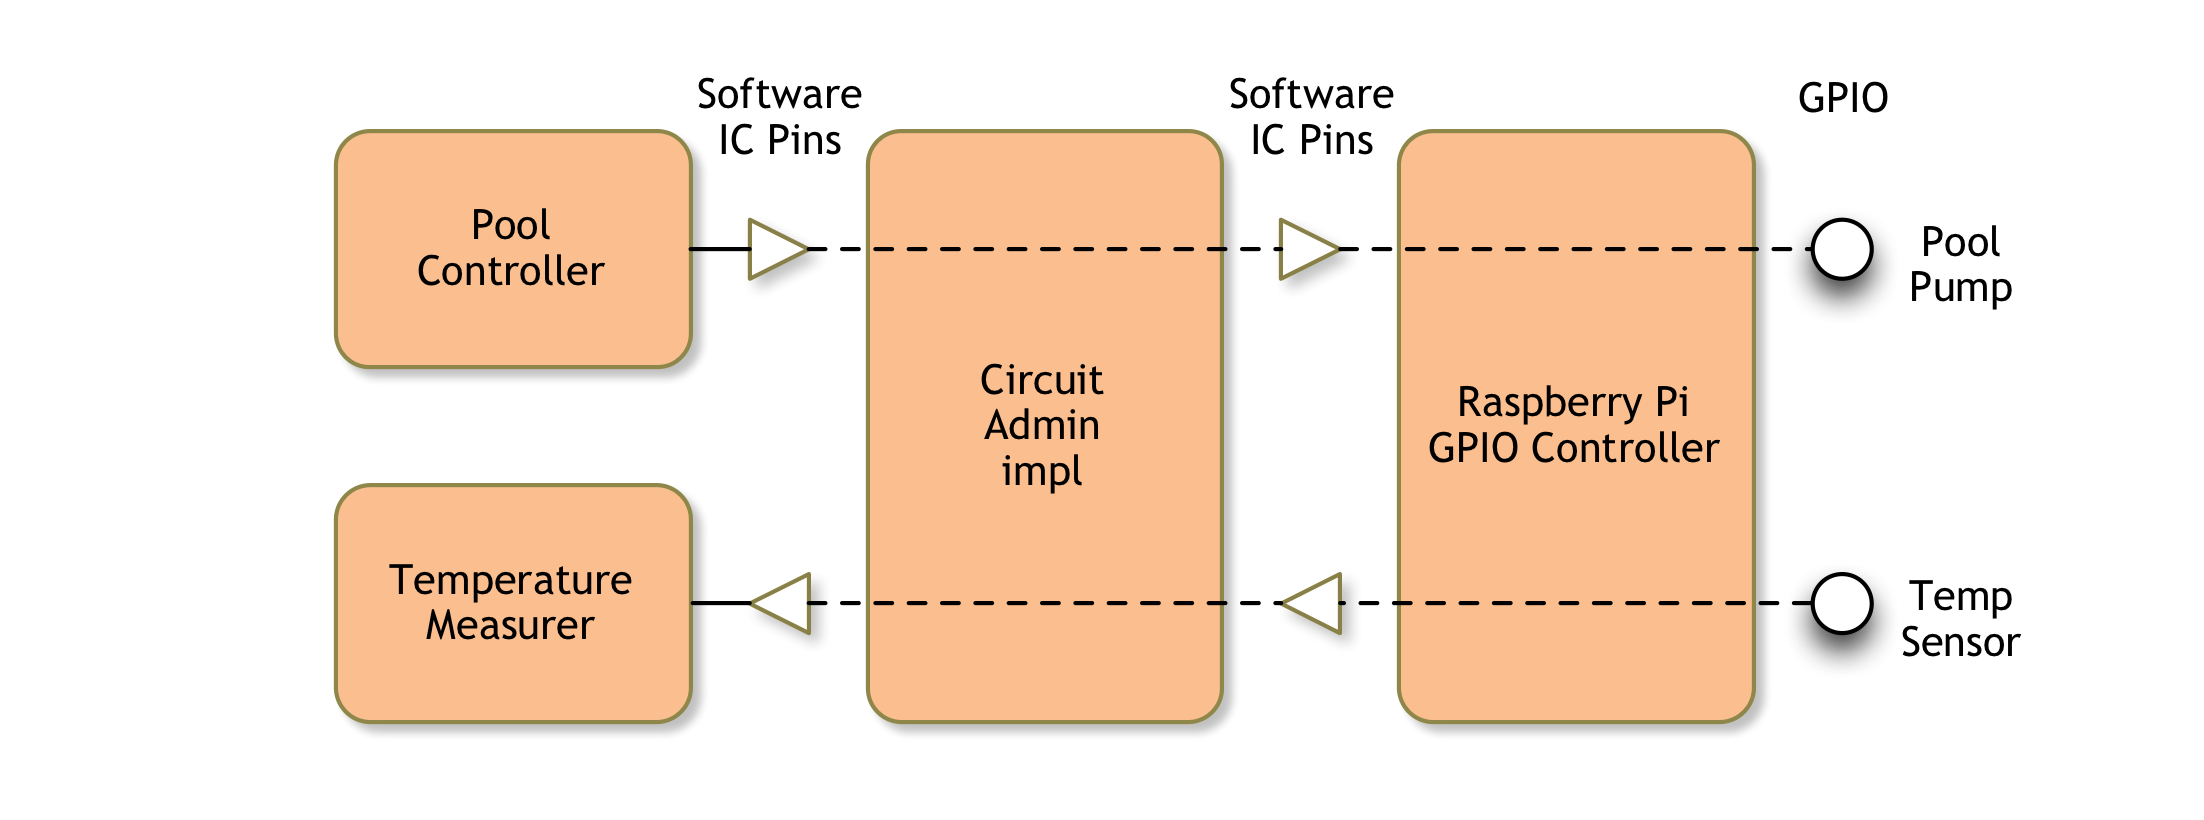
Generally, a bundle that want to control a GPIO provides some functionality that needs to be connected to the real world. So the bundle has a requirement for a pin but could not care less what actual pin is used for an actual device. It is the owner of the device that will have to make a choice what pin actually to use for that bundle. For example, assume one bundle has a program to control the pool pump through a relays and another bundle wants to measure the temperature. If those bundles would specify the actual pin number then they would inevitable clash, forcing the user to choose between knowing the temperature or having a clean pool (or buy an extra Raspberry Pi).
Example Usage
The following example implements an inverter controlled by configurations. You can create any number of inverters and then these inverters can be wired together. A source, like a counter, can then be inverted.
@Component(configurationPolicy=ConfigurationPolicy.require)
public class Not extends ICAdapter<Digital, Digital> implements Digital {
	@Override
	public void set(boolean value) throws Exception {
		out().set(!value);
	}

	@Reference protected void setCircuitBoard(CircuitBoard board) {
		super.setCircuitBoard(board);
	}
}
The osgi.enroute.iot.circuit bundle contains a number of standard components and the inverter is already there together with an And, an Or, a Flip and an 8 bit counter.
Introduction
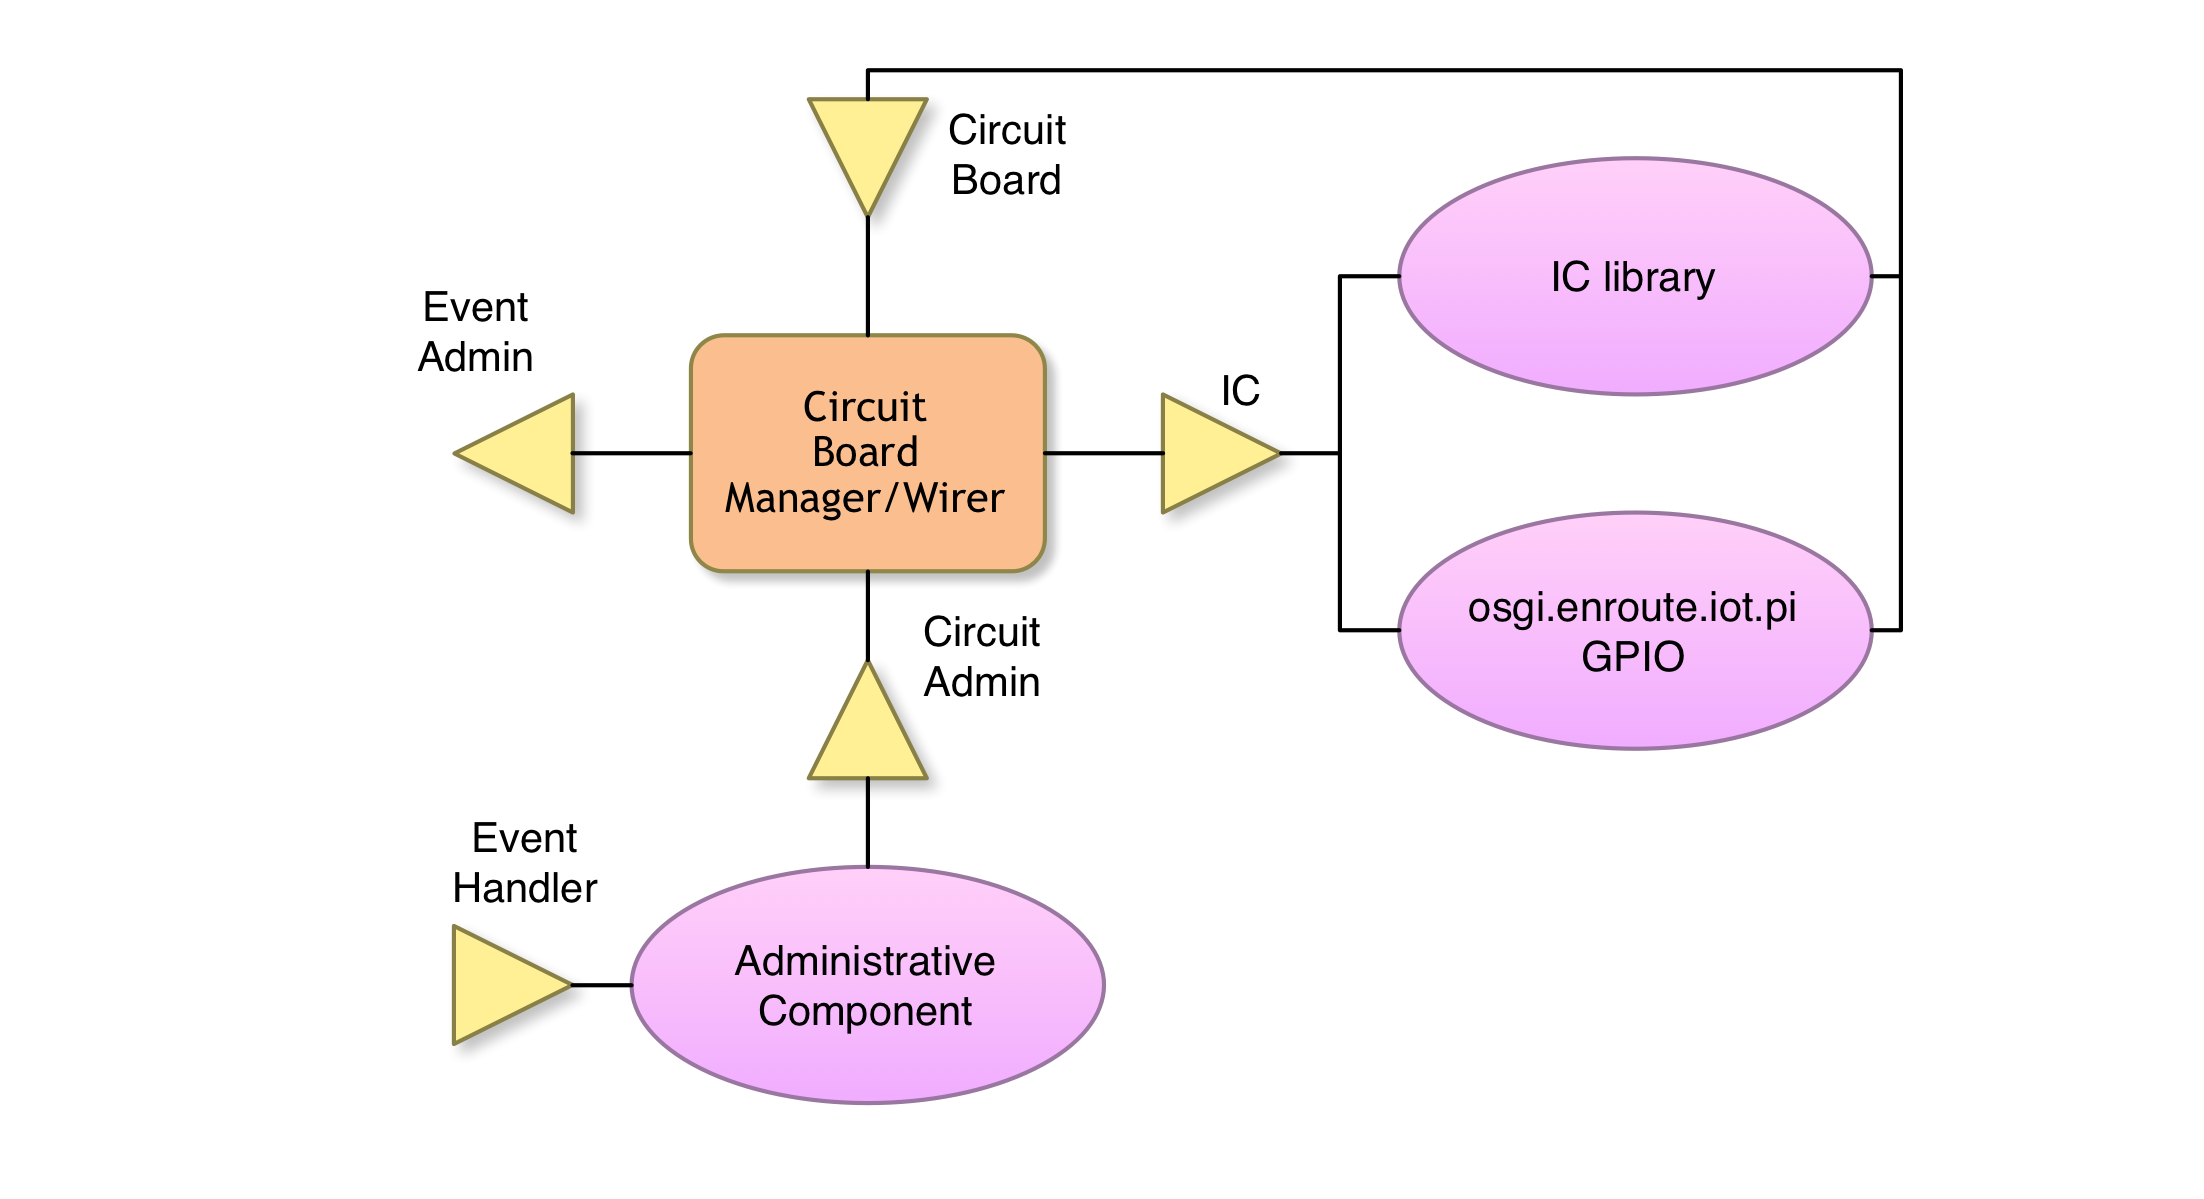
This Circuit Board service is the inevitable extra level of indirection that solves any computing problem. This service acts like a circuit board with ICs that are wired together. The IC interface provides a static description of the IC, what pins it has, its name, etc. This information is passed as a DTO so that the IC services can easily be distributed. The description is quite extensive and is non-trivial. For this reason, OSGi enRoute provides an ICAdapter util class that creates these descriptions from an input and an output interface. In the previous ‘Example Usage’, both the output and input were described by the Digital interface. The Digital interface looks as follows:
public interface Digital {
	void set(boolean value) throws Exception;
}
How can this simple interface work both as an input and an output? The reason is that the circuit will call the methods on these interfaces when it has information for the IC but the IC will call the method on a proxy of the circuit board. This model unifies the differences that normally are used to model the “I call you” or “You call me” approach. An IC calls a proxy, the circuit board calls the IC. Simple, unified.
Each method on the interface describes a pin. The method should be void and take a single value. The circuit will automatically convert values when necessary. The name of the method is the name of the pin. The methods should not, but may throw exceptions. These exceptions will be logged but further ignored. An IC is created by extending the ICAdapter class and implementing the input interface, e.g. Digital.
The following example shows a simple clock that ticks every 500 ms:
public interface Enabled {
	void enable(boolean yes) throws Exception;
}

public interface Clock {
	void tick(boolean value)
}

@Component
public class Clock extends ICAdapter<Enabled,Clock> implements Enabled {
	private Scheduler scheduler;
	private volatile boolean enable;
	private Closeable schedule;
	private boolean tick;

	@Activate void activate() throws Exception {
		schedule = scheduler.schedule(
			() -> out().tick( enable && (tick = ! tick)),
			500
		);
	}
	@Deactivate void deactivate() throws Exception {
		schedule.close();
	}

	public void enable(boolean yes) throws Exception {
		this.enable = enable;
	}

	@Reference void setScheduler( Scheduler scheduler) {
		this.scheduler = scheduler;
	}

	@Reference protected void setCircuitBoard(CircuitBoard board) {
		super.setCircuitBoard(board);
	}
}
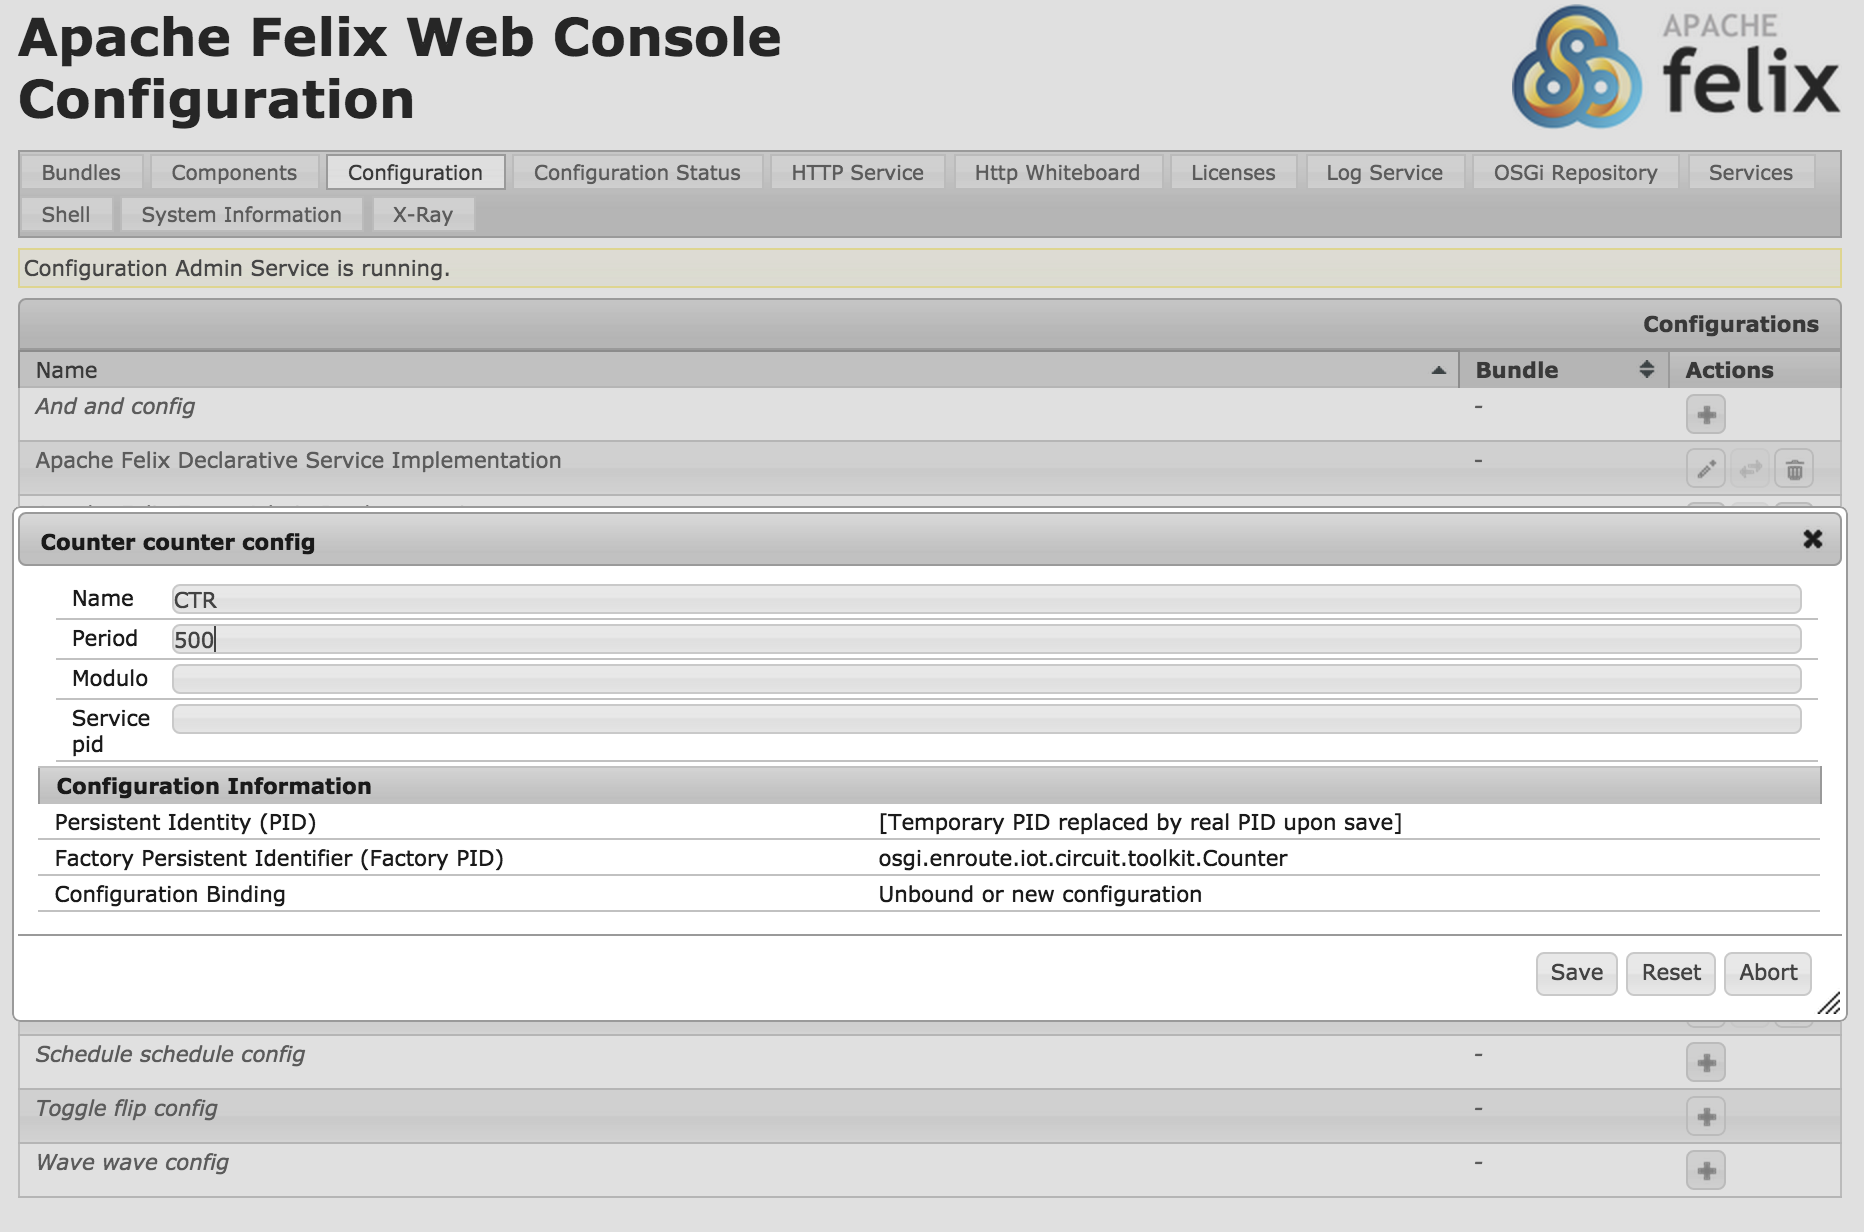
The circuit model is geared to make it really easy to create small reusable components that are mostly driven by configuration. The IC model was therefore designed to be implemented with Declarative Services (DS). DS components can be created via factory configurations. This allows the owner of the device to use Configuration Admin to create the proper set of components. For the configuration, Metatype can be used to describe the configuration so that a tool like Webconsole can create an input form to fill in this configuration. For example, the following picture shows Webconsole editing one of the standard componnents:
IC Adapter
An IC is a service but also tracks the Circuit Board service and fires its events to this service. The Circuit Board tracks the IC services. When there is an event, the Circuit Board service will call the IC fire method for all wired pins. An IC that has data, will call fire on the Circuit Board.
To properly fire requires a bit of coding that is not always trivial. For this reason, the IC Adapter class is provided. A component should extend this class providing an input type and an output type.The component should then implement the input type.
@Component
public class X extends ICAdapter<Input,Output> implements Input {
	...
}
The ICAdapter base class requires a reference to the Circuit Board, it is therefore required to add the following reference to setup the proper dependency:
@Reference protected void setCircuitBoard(CircuitBoard board) {
	super.setCircuitBoard(board);
}
The IC Adapter uses reflection to get the actual types and create the description for the Circuit Board. The only thing that the creator of the IC has to do is implement the input interface and call the circuit board. Implementing the input interface is easy and your IDE will help. Calling the Circuit Board is also easy because the IC Adapter provides a proxy. You can access this proxy by calling the out() method.
void update() {
	out().set( a && b );
}
The IC Adapter guarantees that the proxy is not null.
Naming
The name of the component is decided as follows:
- The
nameservice property if set of the IC. This can usually be set with Configuration Admin - The value of the
getName()method. This method is implemented in IC Adapter to return the last segment of the class name. This method can of course be overridden. - The PID from the service property
- The service ID
Toolkit
An IoT Circuit provider must deliver a number of standard components that are configurable through Configuration Admin (PIDs have the prefix osgi.enroute.iot.toolkit.):
| Name | PID | Description | Pins | Config |
|---|---|---|---|---|
| NOT | ..not | Inverter | set -> set | – |
| AND | ..and | And gate | a,b -> set | – |
| OR | ..or | Or gate | a,b -> set | – |
| Toggle | ..toggle | Toggles the output based on changes in the | set -> set | – |
| the input (/2) | – | |||
| Schedule | ..schedule | A schedule based on a duration and cron expr | enbl -> set | duration |
| cron | ||||
| on | ||||
| Counter | ..counter | An 8 bit counter | enbl -> d0..d7 | period |
| modulo |
The toolkit is likely to be extended so verify Webconsole, all these components use Metatype to provideconfiguration forms.
Circuit Admin
The Circuit Admin service the following API:
getICS– Get a description of the registered ICsconnect– Connect an output of an IC to an input of another ICdisconnect– Remove an existing wiregetWires– List all the created wires
State changes in the circuit board are sent to Event Admin.
User Interface
The OSGi enRoute distro contains the osgi.enroute.iot.circuit bundle that provides an HTML/Javascript UI on top of the Circuit Admin service. This application can use drag and drop to wire ICs together. If you add this bundle to your run requirements then you can go to the /osgi.enroute.iot.circuit URL on your webserver to wire ICs together.
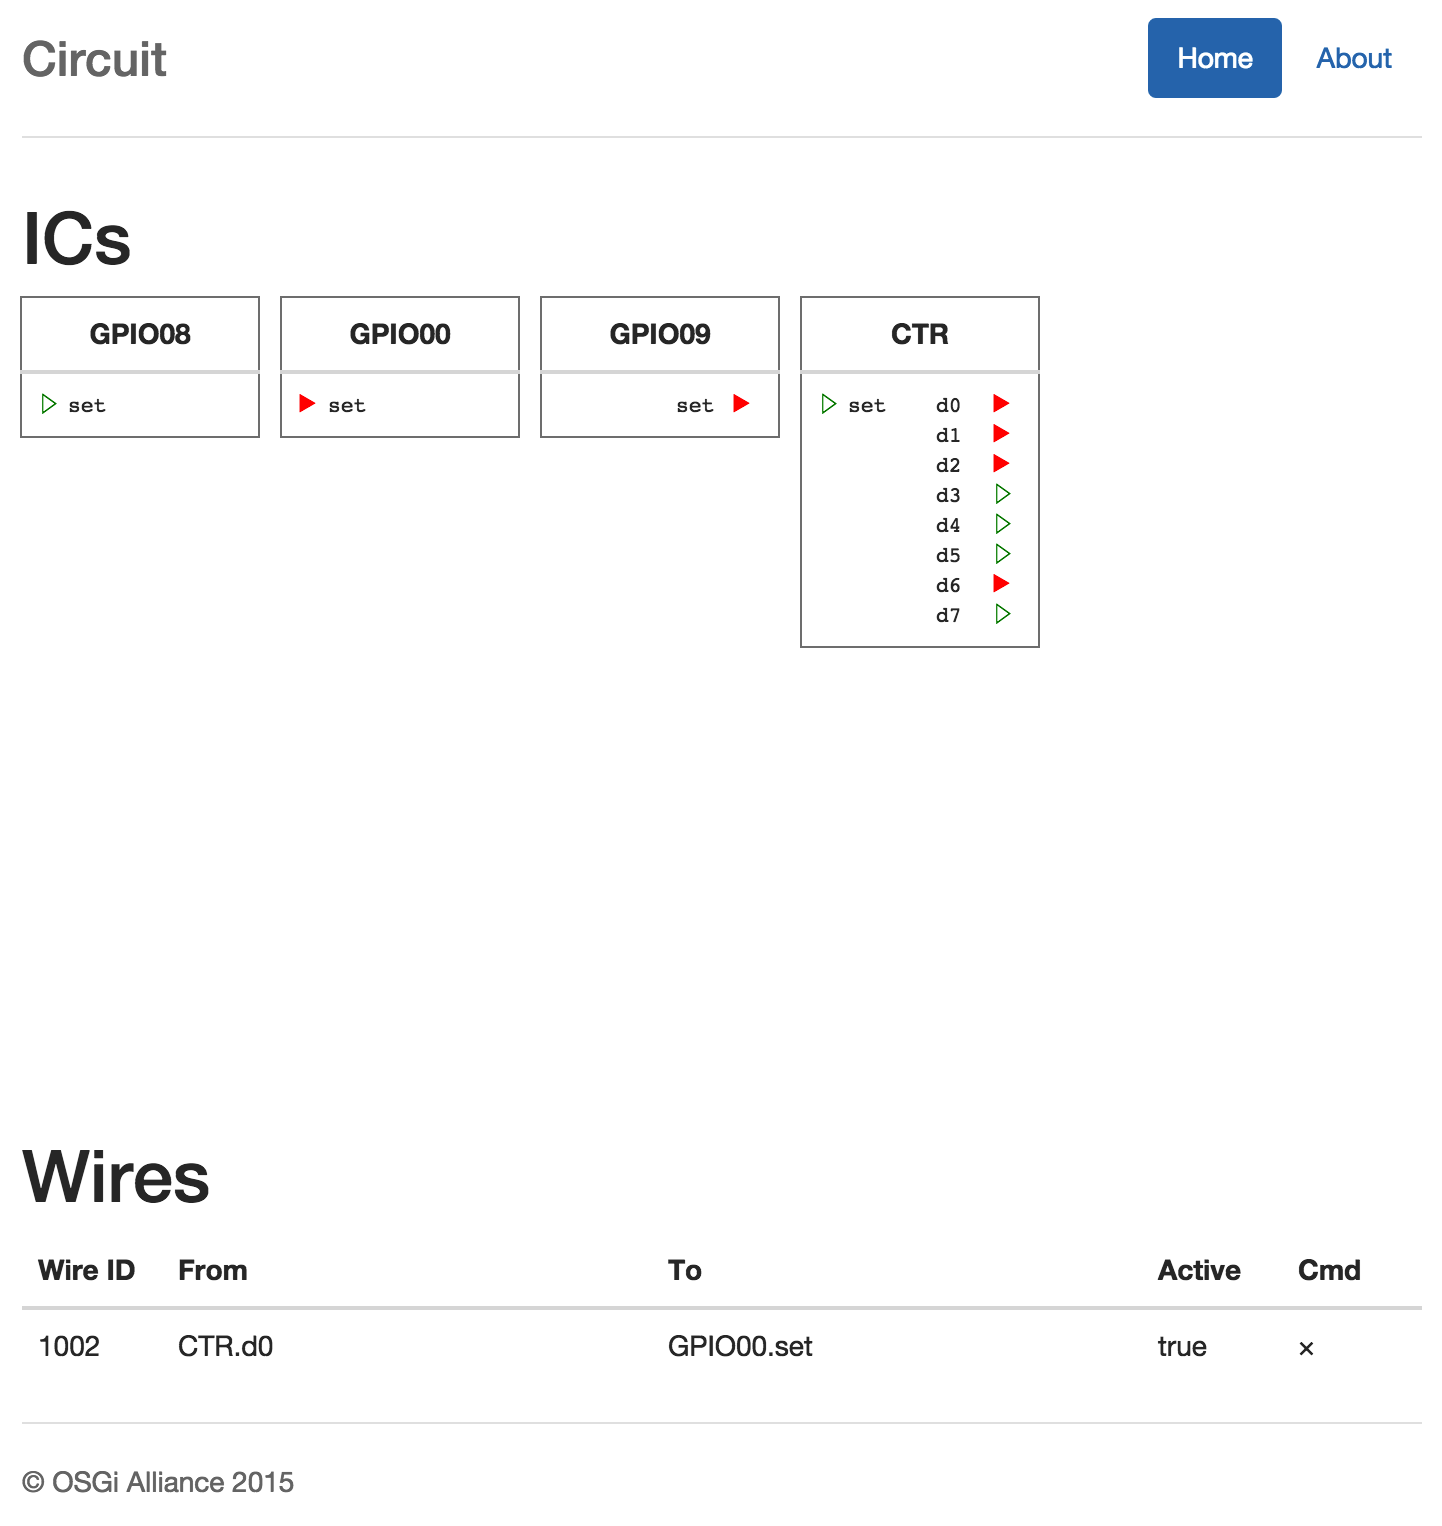
Wires are stored in Configuration Admin so they are in general persisted between framework invocations unless the storage area is cleaned.
Discussion
Fire thread
Currently the values are send to the ICs on the thread that initiated the event. It might be necessary to do this in a background thread to serialize.
Why the dependency on Circuit Board in an IC? The Circuit Board could just register with the IC?
People tend to get upset when they have to write boilerplate code, and the setCircuitBoard reference method is arguably boiler plate. The reason that the boilerplate is there is that DS does not allow inheritance for annotations. This still does not satisfy some people because the Circuit Board service could register with the IC. The reason that this was not done is because that would prohibit the use of remote services. The current API works well over a distributed system. Both IC services and Circuit Board services can be remoted. If the Circuit Board would register with the IC it would have to provide a Java reference which tends to work badly in a remoted environment. That said, we’re working on a reactive pattern that would simplify this.
The GUI does not wrap ICs? Wiring sometimes fails?
The GUI needs some more work …
Prev Next
